

How to Build a Home Sauna: 2026 Step-by-Step Guide
Table of Contents
- Planning Your Home Sauna: Budget, Size, and Placement
- Sauna Building Permits and Code Requirements
- Framing, Insulation, and Vapor Barrier Installation
- Best Wood for Sauna Interior and Bench Construction
- Sauna Heater Electrical Requirements and Safety Clearances
- Ventilation, Airflow, and Moisture Control
- Finishing Touches: Doors, Trim, and Long-Term Wood Care
- Frequently Asked Questions
Last Updated: September 12, 2026
Planning Your Home Sauna: Budget, Size, and Placement
Building a home sauna starts with three decisions: where it goes, how big it is, and what you can spend. Get these right and the rest becomes a sequence of technical steps rather than expensive corrections. This guide walks through the full build, from permits to the final coat of wood oil.
Home sauna construction means framing, insulating, and finishing a dedicated heated room with a sauna heater, ventilation, and benches for dry or wet heat sessions. Most residential builds fall between 4x6 and 8x8 feet, seating two to four people.
Size drives cost more than any other variable: a two-person room needs less lumber, insulation, heater capacity, and electrical work than a four-person room. Decide occupancy first, then work backward.
Separate fixed costs (heater, controls, wiring, insulation) from finishing costs (cedar cladding, benches, door, trim). Finishing is where budgets quietly double, since cedar tongue and groove and bench materials are priced per linear foot.
Indoor vs. Outdoor Placement
Indoor placement wins on convenience: no weather exposure, shorter electrical runs, easier winter access. The trade-off is moisture management, since you are introducing a steam source into your home's envelope. A basement or spare room works if you can vent exhaust outside and slope the floor to a drain.
Outdoor placement, typically a freestanding cedar structure or converted shed, removes moisture risk from the main house and creates a year-round ritual separate from daily life. It costs more in framing, roofing, and weatherproofing, and needs a heavier electrical feed on long runs.
For most homeowners, indoor placement suits a first build; outdoor suits anyone who wants the sauna to feel like a destination rather than another room.
Sauna Building Permits and Code Requirements
Most home sauna builds require a permit, and skipping it is a common mistake. A sauna is a heated structure with new electrical work, which typically triggers both a building permit and a separate electrical permit. Verify locally before buying materials.
Start with your local building department and ask three questions: does a sauna count as a habitable room, what clearances apply to the heater, and does the electrical work require a licensed electrician. In many areas a homeowner can pull a permit but cannot legally do the electrical rough-in.
The International Code Council's residential code resources publishes the model codes most jurisdictions adopt, including requirements for egress, ceiling height, and combustion clearances. Your local amendments will differ, so treat the model code as a starting point rather than the final word.
Two code items catch people out. First, a wood-burning stove needs a listed chimney and specific clearance to combustibles, often more than an electric heater. Second, any 240V circuit in a wet location needs GFCI protection, and inspectors check for it.
Framing, Insulation, and Vapor Barrier Installation
Frame the sauna like any interior room, then treat moisture as the enemy. Use kiln-dried studs spaced at standard intervals so insulation batts fit without gaps. Thermal bridging is real, so a continuous layer of foil-faced insulation over the framing pays for itself in heat retention.
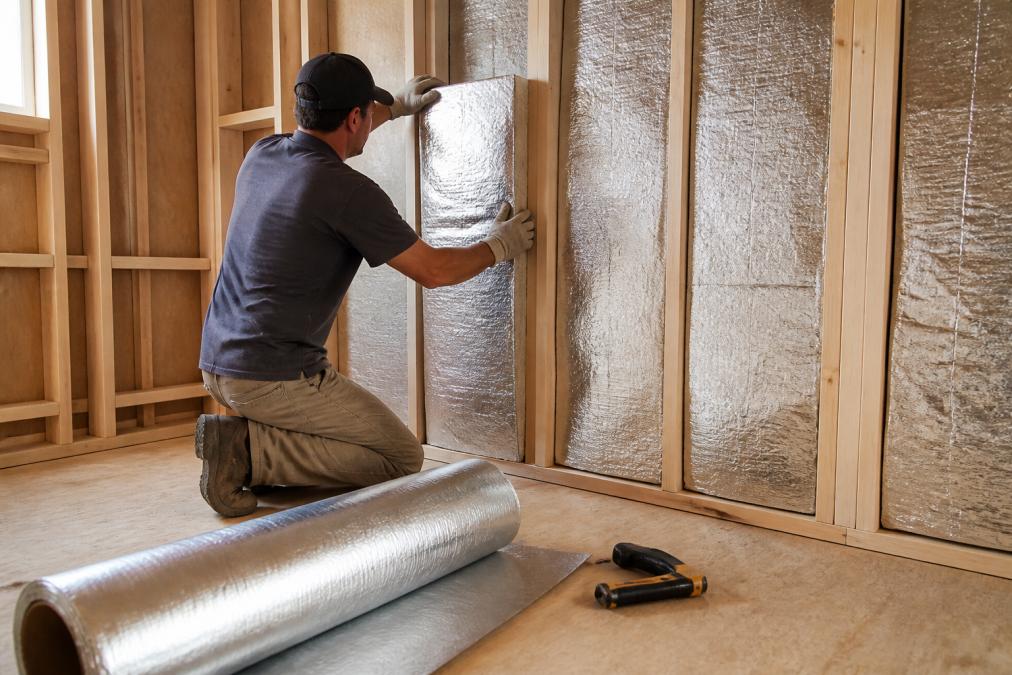
The vapor barrier goes on the warm side of the insulation, facing into the room. Foil facing blocks moisture and reflects radiant heat back toward the benches. Seal every seam with foil tape, a pinhole leak lets moisture into the wall cavity, where it condenses and rots the framing.
Choosing Insulation R-Value and Foil Facing
Aim for R-11 to R-15 in walls and higher in the ceiling, since heat rises and the ceiling loses the most. Foil-faced batts are standard because the reflective surface adds a radiant barrier on top of the conductive R-value.
Do not compress batts into a shallow cavity, compression reduces effective R-value and creates voids where heat escapes. If framing depth is limited, add rigid foil-faced board instead of stuffing thicker batts into a thinner space.
Best Wood for Sauna Interior and Bench Construction
Cedar is the default for good reason: it resists moisture, stays cool to the touch relative to denser woods, and handles repeated heating and cooling. Cedar tongue and groove is standard cladding because the interlocking profile hides fasteners and tightens the thermal envelope.
Other options exist. Thermally modified aspen and pine are common in Scandinavian builds and cost less than cedar in some markets. Whatever you choose, use kiln-dried stock and avoid any wood treated with chemical preservatives, which can off-gas at sauna temperatures. The U.S. Consumer Product Safety Commission publishes guidance on indoor air quality and material safety worth reviewing before you commit to a species.
For benches, use the same species as the walls and finish with a food-safe, heat-rated wood oil rather than varnish, which traps moisture and blisters under sauna heat.
Bench Ergonomics and Ceiling Height
Bench ergonomics decide whether your sauna is comfortable for twenty minutes or unbearable after five. The upper bench should sit high enough that your feet rest near the top of the heater stones, where heat concentrates. A typical arrangement uses two tiers: an upper bench for lying or sitting, a lower bench for feet and stepping.
Ceiling height matters: too high pushes heat above your head, too low feels oppressive and crowds the upper bench. Aim for roughly 4 to 5 feet of clearance above the upper bench surface.
Add a backrest and headrest, the difference between a bench you tolerate and one you look forward to.
Sauna Heater Electrical Requirements and Safety Clearances
Sauna heater electrical requirements depend on heater type and room volume. Electric sauna heaters run on a dedicated 240V circuit sized to the heater's wattage, and every installation needs GFCI protection and correct wiring gauge for the run length. Undersized wire on a long run causes voltage drop and shortens heater life.
| Heater Type | Typical Circuit | Key Safety Item | Best For |
|---|---|---|---|
| Electric sauna heater | Dedicated 240V, GFCI protected | Correct wiring gauge for run length | Indoor builds, easy control |
| Wood-burning stove | No electrical circuit | Listed chimney, fire-rated clearances | Outdoor builds, off-grid feel |
How to Size the Circuit for Your Heater
Heater wattage scales with room volume. A common rule of thumb is roughly 100 watts per square foot of floor area for a well-insulated indoor room, adjusted upward for uninsulated walls, glass doors, or cold-climate outdoor builds. A 5x7 room (35 sq ft) lands near 3.5 kW; a 7x7 room (49 sq ft) near 5 kW. Manufacturers' recommended wattage ranges override the rule of thumb.
Once you know the wattage, amperage follows from Ohm's law. A 240V, 6 kW heater draws 25 amps, calling for a 30-amp breaker and 10-gauge copper wire (osha.gov). A 240V, 9 kW heater draws 37.5 amps, calling for a 50-amp breaker and 6-gauge wire. A 240V, 4.5 kW heater draws about 18.75 amps and can run on a 30-amp breaker with 10-gauge wire. Never size the breaker to the exact draw, leave headroom, and never exceed the wire's ampacity rating.
Wire Gauge and Voltage Drop Over Long Runs
Gauge matters more than most DIYers expect. A 10-gauge copper conductor is rated for roughly 30 amps at 140°F in a typical residential installation, and 6-gauge for roughly 50 to 55 amps. If your panel is far from the sauna, voltage drop becomes the limiting factor: a common pattern is to bump one wire size for every 50 to 100 feet beyond the first 50 feet. A 6 kW heater on a 100-foot run that would normally use 10-gauge may need 8-gauge to keep voltage drop under about 3 percent. Undersized wire makes the heater run cooler than rated, shortening element life and wasting energy.
GFCI, Disconnects, and Wet-Location Rules
Any 240V circuit serving a sauna is a wet-location circuit, and GFCI protection is required. A GFCI breaker at the panel is simplest, though a GFCI receptacle or dead-front device near the heater works if rated for the load. Inspectors check for it, and it is one of the few code items that is genuinely life-safety rather than paperwork.
A local disconnect within sight of the heater is also standard practice, letting a technician kill power without walking back to the panel and satisfying the requirement that disconnecting means be readily accessible. A simple 240V toggle or small enclosed switch rated for the amperage is enough.
Clearances for Electric vs. Wood-Burning Heaters
Safety clearances are non-negotiable and differ sharply by heater type. Electric heaters rely on the manufacturer's listed clearance to combustibles, often 2 to 6 inches from the sides and back and more above the unit. Follow the nameplate or installation manual, the listing is what the inspector checks.
Wood-burning stoves are a different category: they require a listed chimney, a floor protector with a specified R-value under and in front of the stove, and clearance to combustibles frequently 12 inches or more on all sides and higher at the flue. Single-wall stovepipe needs more clearance than double-wall insulated pipe. For any combustion appliance, install a carbon monoxide alarm nearby and confirm chimney height meets the manufacturer's draft requirements.
Guard rails around the heater protect legs and keep towels off hot surfaces. On electric heaters, a wood or metal guard that maintains the listed clearance is standard; on wood stoves, the guard must not block air circulation around the firebox.
Ventilation, Airflow, and Moisture Control
Proper ventilation helps a sauna last longer and prevents mold growth behind the cedar. Place an intake low near the heater so incoming air warms as it rises, and an exhaust vent high on the opposite wall, ideally near the ceiling. This creates a convection loop that replaces stale, humid air without dumping your heat.
A common mistake is sealing the room completely to trap heat. That traps moisture too. A small adjustable exhaust vent lets you tune airflow: nearly closed for a hot, dry session, more open for wet heat and faster drying afterward.
After every session, leave the door open and run the exhaust vent until the room is dry. A thermometer and hygrometer mounted inside confirm the room has returned to ambient humidity before you close it up. Moisture control is a habit, not a one-time installation step.
Finishing Touches: Doors, Trim, and Long-Term Wood Care
Finish with a proper sauna door, typically tempered glass, which handles heat and moisture without warping and makes a small room feel larger. Set the threshold to clear the sloped floor and seal the frame against drafts. Trim should use the same kiln-dried species as the walls, fastened with stainless or galvanized nails that will not corrode in humid air.
Long-Term Wood Care: The Part Most Guides Skip
A cedar or hemlock sauna needs a maintenance rhythm to survive years of heat cycling without graying out, cracking, or growing mold behind the cladding. Regular maintenance helps ensure a sauna remains in good condition for long-term enjoyment.
Annual re-oiling. Benches and interior cladding should be re-oiled once a year, or more often if the wood looks dry or stops beading water. Use a penetrating, heat-rated, food-safe oil, not a film-forming finish. Apply a thin coat with a lint-free cloth, let it soak 15 to 30 minutes, then wipe off the excess; a heavy coat feels tacky and attracts dust. Most sauna oils blend tung, linseed, or paraffin oil, check the label says it is rated for sauna use and safe for skin contact at temperature.
What to inspect each year. Pull any access panel and check the vapor barrier behind the cladding. Tears, gaps at seams, or lifted foil tape are early warning signs of moisture intrusion. Check the corners where walls meet the ceiling and floor, the first places mold appears, and look for dark streaks, a musty smell, or soft framing. Surface mold usually yields to a diluted vinegar wipe and a full dry-out; mold behind the cladding means the barrier failed and the affected section needs to come out.
Species-specific aging. Cedar ages gracefully but grays to silver if left unoiled and can develop surface checks (small cracks) as it cycles. Those checks are cosmetic, not structural, but they hold moisture, so oiling them is worthwhile. Hemlock is denser and more prone to resin bleed at high heat; it needs more frequent oiling and a lower bench temperature. Thermally modified aspen and pine are dimensionally stable and rot-resistant, but the heat treatment makes them brittle, so avoid over-tightening fasteners and inspect for splits around screw holes. Never apply polyurethane or varnish inside a sauna, the film traps moisture, blisters under heat, and can release fumes at temperature.
Hardware and seals. Stainless and galvanized fasteners will not corrode, but door gaskets, hinges, and silicone seals wear. Inspect the door gasket annually for compression and replace it when it stops sealing, a door that no longer closes tight lets heat and moisture escape, shortening the sauna's life and raising your energy bill.
Drying routine as maintenance. The biggest factor in long-term wood health is what you do after every session: leave the door open and run the exhaust vent until the room returns to ambient humidity. A thermometer and hygrometer mounted inside confirm the dry-out rather than guess. Moisture control is a habit, not a one-time installation step, and it keeps the annual oiling and inspection from turning into a repair project.
Keep a bucket and ladle for water on the stones, and a thermometer and hygrometer for monitoring. These small tools turn a finished room into a working sauna, and a maintenance routine into a five-minute habit.
Frequently Asked Questions
Do you need a building permit to build a sauna in your backyard?
In most U.S. jurisdictions, yes. A permanent outdoor sauna typically requires a building permit because it involves framing, electrical work, and sometimes plumbing. Small prefab kits under a certain square footage may be exempt, but rules vary by county and HOA. Check with your local building department before you buy materials. Bring your site plan, electrical load calculations, and heater specifications to the permit office so they can review safety clearances and wiring in one visit.
What are the sauna heater electrical requirements for a home build?
Most residential electric sauna heaters run on 240V and draw 30 to 60 amps depending on room size. That usually means a dedicated circuit with 8 or 6 gauge wiring, a GFCI breaker, and a disconnect switch near the heater. A licensed electrician should size the circuit to the heater's nameplate rating. Undersized wiring is a fire risk and will fail inspection. Confirm your panel has spare capacity before framing begins, since upgrading a service panel adds significant cost and time.
What is the best wood for a sauna interior?
Cedar is the most common choice in the U.S. because it resists moisture, stays cool to the touch, and holds up to daily heat cycles. Other options include thermally modified aspen, hemlock, and spruce. Avoid woods that bleed sap or splinter, like pine with high resin content. Whatever you pick, use kiln-dried lumber and leave it unfinished on the interior. Sealants and stains trap moisture and can off-gas at sauna temperatures, which defeats the purpose of a clean, breathable room.
How do you properly insulate and vapor-seal a sauna?
Install foil-faced insulation batts between the wall studs with the foil facing into the room, then tape all seams with foil tape to create a continuous vapor barrier. This keeps moisture out of the wall cavity and reflects heat back into the sauna. Aim for R-13 to R-15 in walls and R-19 or higher in the ceiling. Leave a small air gap between the foil and the wood paneling so the cladding can expand and contract without trapping condensation against the barrier.