

How to Design a Home Contrast Therapy Space
Last Updated: October 22, 2026
Quick Summary
A home contrast therapy space is a dedicated room or zone built for alternating heat and cold exposure, and it works best when you plan the wet zone, dry zone, and equipment together before you buy anything. Start with a floor drain, exterior ventilation, and room to walk between units, then pick the heat source before sizing the cold side to match.
- Plan a finished room of at least 10 ft by 12 ft for a two-person sauna plus chiller-equipped plunge.
- Keep a 36 in clear walkway between units and 36 in of clear floor in front of each door.
- Install a floor drain with a quarter-inch per foot slope and waterproof flooring before anything else.
- Run three separate circuits: a dedicated sauna heater circuit, a GFCI chiller circuit, and a general circuit.
- Size the exhaust fan to move at least 1 cfm per square foot of floor area, ducted outdoors on a humidistat.
Table of Contents
- Start with a Clear Plan for Your Home Sauna and Cold Plunge Setup
- Choosing a Sauna and Cold Plunge for Your Contrast Therapy Space
- Sauna and Cold Plunge Layout: Room Dimensions and Clearances
- Cold Plunge Drainage and Flooring: What to Install
- Ventilation, Moisture Control, and Electrical Requirements
- Building a Contrast Therapy Routine at Home
- Maintenance, Safety, and Total Cost of Ownership
- Frequently Asked Questions
Start with a Clear Plan for Your Home Sauna and Cold Plunge Setup
A home contrast therapy space is a dedicated room or zone built for alternating heat and cold exposure, and it works best when you plan the wet zone, dry zone, and equipment together before you buy anything. This guide from Heaven 417 covers the full process, from sizing the room to wiring the chiller.
Most people start by shopping for a sauna. That's backwards, the room decides the equipment.
Assess Your Space and Budget
Start with a tape measure and a budget split into four buckets:
- Equipment: sauna, cold plunge tub, and chiller
- Build-out: flooring, drainage, framing, ventilation
- Utilities: electrical circuits, plumbing, and permits
Build-out costs often surprise homeowners more than the equipment does, so budget for it first.
Choose the Right Room or Zone
The best room has a floor drain, exterior ventilation, and room to walk between units, a garage recovery bay, spare bedroom, or covered patio all work. A basement works only if you can vent moisture outdoors. Skip any room without a path for moisture to leave; trapped humidity damages framing, paint, and electronics.
Choosing a Sauna and Cold Plunge for Your Contrast Therapy Space
Pick the heat source first, then size the cold side to match. That order keeps the room balanced and the session timing predictable.
For the heat side, an indoor infrared sauna fits most homes because it needs no chimney and runs on a standard dedicated circuit. The Blisspod Bergen two-person indoor sauna pairs full-spectrum infrared with a front-facing red light panel, so you get heat and light therapy in the same footprint.

For cold, you have two paths:
- Chiller-equipped tub: holds a set temperature without ice runs. The RevX Acrylic X Tub with LUX chiller cools to 34°F and heats to 104°F, with a 1.5 horsepower chiller and built-in filtration.
- Cedar tub plus a separate chiller: the Aurland Cedar Ice Bath pairs a Canadian red cedar exterior with a stainless steel liner for easier hygiene, and it can sit indoors or out.
A dedicated chiller matters more than the tub. The Frostgard Pro holds water between 3°C and 42°C, runs UV and ozone disinfection, and connects to a phone app so you aren't fiddling with dials before every session.


Sauna and Cold Plunge Layout: Room Dimensions and Clearances
Below are the dimensions, clearances, and door widths to measure before you buy equipment.
Start With a Minimum Room Envelope
For a two-person infrared sauna plus a chiller-equipped plunge, plan on a finished room of at least 10 ft by 12 ft (120 sq ft) with an 8 ft ceiling.
Measure the room's finished interior, after framing, insulation, tile, and furring strips. A "10 by 12" garage bay often finishes at 9 ft 6 in by 11 ft 6 in, killing layouts that looked fine on paper.
Clearances That Actually Matter
Use these as working minimums, then add margin where you can:
- Walkway between units: 36 in clear. 30 in is the absolute floor for a one-person room; below that, a wet barefoot person turns sideways and risks a fall.
- Clear floor in front of each door: 36 in deep by the door's full width. Sauna doors typically swing out for safety; a 24 in door needs 24 in of swing plus standing room.
- Ceiling height: 7 ft 6 in minimum above the sauna roof, plus 12 in of clearance above the heater for venting. Infrared panels need 6 to 12 in of clearance from the ceiling and side walls per most manufacturers' instructions.
Door Widths and the Wet-Person Path
A 24 in sauna door is common but tight for larger adults; 28 to 30 in is the practical minimum. The plunge area needs a path at least 36 in wide from the sauna door to the tub, never crossing carpet, a stair, or a change in floor level, a wet, heated person stepping onto carpet is the most common fall hazard in home setups.
Sample Layouts by Room Size
- Under 100 sq ft (compact): stack the sauna and plunge on one long wall, share a single floor drain centered between them, put the rinse shower at the far end, and use a 30 in walkway. Works for one person; tight for two.
- 100 to 160 sq ft (standard): sauna and plunge on opposite walls, 36 in center walkway, shower and drain at one end, bench and towel storage at the other. This is the layout most two-person households land on.
- Over 160 sq ft (premium): add a recovery lounge with seating, keep the wet zone behind a curb or slight floor slope, and give the chiller its own ventilated closet or alcove with service access.
Wet Zone and Dry Zone Separation
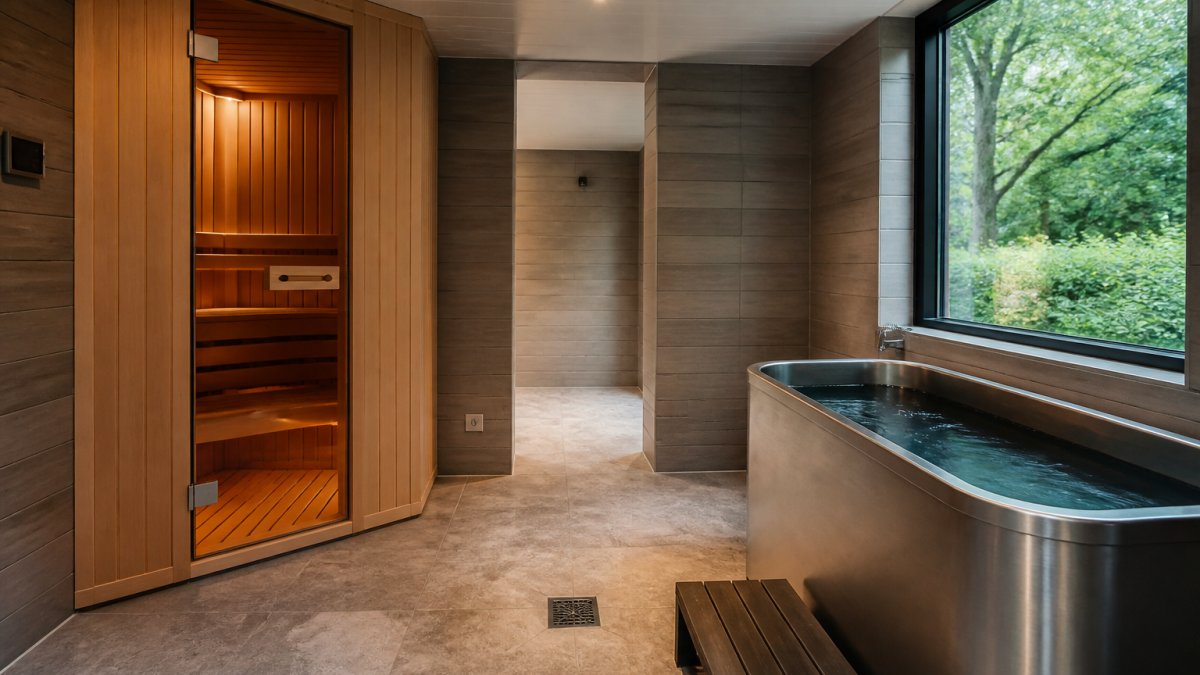
Split the room into two zones: the wet zone holds the plunge, drain, and rinse shower; the dry zone holds the sauna, bench, towels, and a place to sit between rounds. Keep at least one body length (about 6 ft) between the plunge and any outlet, speaker, or wooden furniture, splash travel is constant.
A simple decision rule:
- Room under 12 square meters: stack the sauna and plunge on one wall, share one drain.
- Room 12 to 20 square meters: opposite walls, center walkway, shower at the far end.
- Room over 20 square meters: add a recovery lounge with seating and no screens.
Cold Plunge Drainage and Flooring: What to Install
Install a floor drain and a sloped, waterproof floor before anything else, the step people skip, and the one that protects the whole investment.
Specify these:
- Slope: quarter-inch per foot toward the drain
- Flooring: porcelain tile, sealed concrete, or luxury vinyl rated for wet areas
- Drain: a removable strainer trap so you can clean it
Cedar and stainless both shed water well, but the floor under them takes the beating. Treat the floor as part of the equipment.
Aurland Cedar Ice Bath - With 1HP Chiller →
Ventilation, Moisture Control, and Electrical Requirements
Ventilation and electrical work are where a home build most often fails inspection, so handle them early. The U.S. Consumer Product Safety Commission publishes guidance on safe electrical installations in damp areas, and your local building department sets the permit rules that actually apply. Below are the pre-installation checks most guides skip, the ones that decide whether your room passes inspection and stays dry.
Electrical: Circuits, GFCI, and Load
Plan the electrical load before you frame. A typical home contrast space needs three separate circuits:
- Sauna heater circuit: a dedicated 240V circuit. Residential infrared saunas commonly draw 15 to 30 amps; traditional electric saunas can draw 40 to 60 amps. Size the wire and breaker to the nameplate rating, not to a guess.
- Chiller circuit: a dedicated 120V or 240V circuit depending on the model, GFCI-protected. Chillers with compressors have high startup current, so don't share the circuit with anything else.
- General circuit: lighting, exhaust fan, and receptacles, GFCI-protected in the wet zone.
GFCI protection is required for receptacles in bathrooms, garages, basements, and outdoors under the National Electrical Code (NEC), and most local amendments extend it to any damp location. AFCI protection is generally required for branch circuits in dwelling units.
Keep all receptacles and switches at least 36 in from the plunge rim and outside the splash zone. No cords across the wet zone, ever.
Plumbing and Drainage
A floor drain is the backbone of the wet zone. Specify a removable strainer and a trap primer so the trap doesn't dry out and let sewer gas in, and slope the floor a quarter-inch per foot toward the drain. If the slab can't be sloped, build a raised platform under the tub and drain it to a sump or dedicated line.
Ventilation and Moisture Control
An exhaust fan sized to the room, ducted outdoors, on a humidistat is the minimum. Size the fan to move at least 1 cfm per square foot of floor area, and more if the plunge is uncovered.
In humid climates, add a dehumidifier and seal the wall assemblies. The U.S. Department of Energy notes that moisture and air sealing affect both durability and energy use, which matters in a room that runs hot and wet daily.
Permits and Code Compliance
Pull permits before you cut anything. Most jurisdictions require permits for new electrical circuits, plumbing tie-ins, and structural changes. The permit office will tell you which code edition applies and what inspections are required. Skipping the permit can void insurance and complicate a future sale.
Building a Contrast Therapy Routine at Home
Build the routine around rounds, not minutes: a standard session runs three to five cycles of heat, cold, then rest.
A simple starting protocol:
- Heat: 10 to 15 minutes in the sauna
- Cold: 1 to 3 minutes in the plunge
- Rest: 2 to 3 minutes at room temperature
- Repeat: 3 to 5 rounds
- Finish: on cold, then rest
Keep the plunge between 45°F and 55°F for most people, warmer and the cold stimulus fades, colder and you shorten the safe window. Chasing longer sessions instead of more rounds is a common mistake; consistency beats duration.
Maintenance, Safety, and Total Cost of Ownership
Budget for upkeep as you did the build: total cost of ownership includes power, water care, filters, and occasional service calls.
Weekly and monthly tasks:
- Test and balance plunge water chemistry
- Rinse and replace filters on schedule
- Wipe down the sauna benches and floor
Safety screening matters too. The American Heart Association advises checking with a clinician before extreme temperature exposure.
Never combine alcohol with a sauna or plunge session. Never plunge alone in a remote space without a way to call for help.
Frequently Asked Questions
What do you need for a home contrast therapy setup?
A complete home contrast therapy space needs a heat source (traditional or infrared sauna), a cold plunge or cold-water option, and the infrastructure to support both: waterproof flooring, a floor drain, ventilation, and dedicated electrical circuits. For the cold side, a chiller like the Frostgard Pro ($3,999) or a full system like the RevX Acrylic X Tub ($7,500) keeps water at temperature without daily ice runs. Plan for clearances around each unit and a drying area between them.
How much space do you need for a sauna and cold plunge?
A two-person sauna typically needs a footprint of about 4 by 6 feet, and a cold plunge tub adds roughly 3 by 5 feet. Include at least 3 feet of clearance in front of each unit and a 4-foot walkway between them for safe movement. A room of 10 by 12 feet comfortably fits both with a small drying bench. If space is tight, a corner layout or a garage recovery bay can work, but keep the wet and dry zones distinct.
Can you put a sauna and cold plunge next to each other?
Yes, placing them side by side is the standard contrast therapy layout. Keep a 4-foot walkway between them so you can move safely while wet, and place the cold plunge on the wet side of the room with a floor drain nearby. The sauna should sit on the dry side, elevated on a waterproof base. Avoid placing the cold plunge directly against the sauna wall without a vapor barrier, since constant moisture can damage the sauna's wood over time.
What flooring is best for a home sauna and cold plunge area?
Porcelain tile with a slip-resistant rating is the most practical choice for a contrast therapy space. It handles standing water, resists temperature swings, and is easy to sanitize. Install a floor drain at the low point of the wet zone and slope the tile toward it. Avoid hardwood and laminate, which warp with moisture. If you want a warmer feel underfoot in the dry zone, use interlocking rubber or teak mats that can be removed and dried.
Designing a contrast therapy space takes more planning than most homeowners expect, and that's exactly why the result feels so good when it's done right. At Heaven 417, we help you match the right cedar sauna and cold plunge to your room, your budget, and your routine, with guidance from selection through installation and easy monthly payments at checkout. Get started with Heaven 417 and build a recovery space you'll use for years.